What is JSF?
JSF or Java Server Faces is a Java Framework predominantly used for it UI/front-end capabilities.
What are the Benefits of JSF?
1. With JSF, you can build applications with rich user interfaces with complex functionality with minimal time and effort.
2. Its an open source framework, so you don’t have to pay a penny for using it. And we love free stuff’s , isn’t it !
3. Lot of UI libraries in the market in the form of Primefaces, RichFaces, IceFaces, MyFaces etc
4. Comparatively easy to learn.
Steps to Build a Simple ‘HelloWorld’ Application’ in JSF
Tools Required
Java, Eclipse, Apache Tomcat Server
Steps
1. Create a new Dynamic Web Project in Eclipse: File>New>Dynamic Web Project
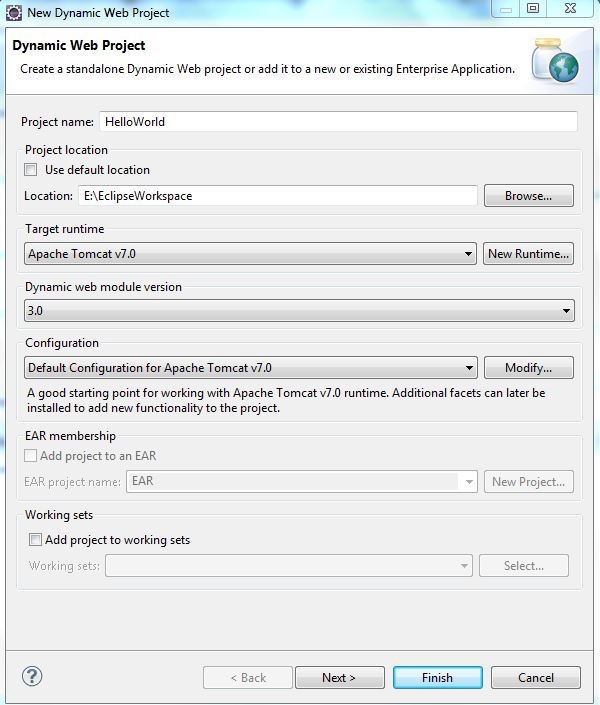 Press Next
2. Click on the checkbox: ‘Generate web.xml deployment descriptor’

Press Finish
3. Right Click on the Project ‘HelloWorld’ just created and go to Properties> Project Facets. Check the ‘JavaServer Faces’ check box.
 4. Click on ‘Further configuration available’ link on bottom. And check the Mojarra User library. Set others as in the picture below. And press OK.

5. Check your web.xml file in WEB-INF, it should be automatically created with following contents.
 <?xml version="1.0" encoding="UTF-8"?>
 <web-app xmlns:xsi="http://www.w3.org/2001/XMLSchema-instance" xmlns="http://java.sun.com/xml/ns/javaee" xmlns:web="http://java.sun.com/xml/ns/javaee/web-app_2_5.xsd" xsi:schemaLocation="http://java.sun.com/xml/ns/javaee http://java.sun.com/xml/ns/javaee/web-app_3_0.xsd" id="WebApp_ID" version="3.0">
<display-name>HelloWorld</display-name>
 <welcome-file-list>
 <welcome-file>index.html</welcome-file>
 <welcome-file>index.htm</welcome-file>
 <welcome-file>index.jsp</welcome-file>
 <welcome-file>default.html</welcome-file>
 <welcome-file>default.htm</welcome-file>
 <welcome-file>default.jsp</welcome-file>
 </welcome-file-list>
 <servlet>
 <servlet-name>Faces Servlet</servlet-name>
 <servlet-class>javax.faces.webapp.FacesServlet</servlet-class>
 <load-on-startup>1</load-on-startup>
 </servlet>
 <servlet-mapping>
 <servlet-name>Faces Servlet</servlet-name>
 <url-pattern>/faces/*</url-pattern>
 <url-pattern>*.xhtml</url-pattern>
 </servlet-mapping>
 <context-param>
 <description>State saving method: 'client' or 'server' (=default). See JSF Specification 2.5.2</description>
 <param-name>javax.faces.STATE_SAVING_METHOD</param-name>
 <param-value>client</param-value>
</context-param>
 <context-param>
 <param-name>javax.servlet.jsp.jstl.fmt.localizationContext</param-name>
 <param-value>resources.application</param-value>
 </context-param>
 <listener>
 <listener-class>com.sun.faces.config.ConfigureListener</listener-class>
 </listener>
 </web-app>
6. Create a new xhtml file under the Web Content directory with name as helloworld.xhtml.
<?xml version="1.0" encoding="ISO-8859-1" ?>
<!DOCTYPE html PUBLIC "-//W3C//DTD XHTML 1.0 Strict//EN" "http://www.w3.org/TR/xhtml1/DTD/xhtml1-strict.dtd">
<html xmlns="http://www.w3.org/1999/xhtml"
xmlns:c="http://java.sun.com/jsf/core"
xmlns:ui = "http://java.sun.com/jsf/facelets"
xmlns:h = "http://java.sun.com/jsf/html">
<head>
<meta http-equiv="Content-Type" content="text/html; charset=ISO-8859-1" />
<title>Insert title here</title>
</head>
<h:body>

<h:outputLabel value="Hello World"></h:outputLabel>

</h:body>
</html>
7. Cross check the project Structure.

8. Create a server from the ‘new server wizard’ of Server view and select the appropriate Server. Press Finish.

9. Right Click on the server thus created in the ‘ Server view’ and click on ‘add and remove’. Add the ‘HelloWorld’ JSF project to it. Press Finish.

10. Right Click on the Server and click ‘Start’. If everything goes fine, the server will start successfully.

11. Go to browser and test the ouput. I have used the port number as 8081 since i changes it from 8080 to 8081. If you have not changed, you need to keep it 8080.

Resolving Errors if any
1. Change the server ports if required.

2. Set the server to use while running the project.

3. If you get a context initialization error, try to remove the below listener registration from dd.
  <listener>
 <listener-class>com.sun.faces.config.ConfigureListener</listener-class>
 </listener>
